
Live Wire
First, I need to explain about the live wire. You will need to take your hook out of the crochet from time to time. When you put it back in, it is important to be sure all of your wires are still going the right way. When I refer to the “live wire” or “live side”, I am talking about the portion of the wire that is closest to the spool.
 |
| live wire |
Notice that the “live side” of the wire is on the side of the hook closest to you. It will always be on this side of the hook. Anytime you pull your hook out, make sure you re-insert it with the live side nearest you.
Materials
For this sample, I will use a no.8 hook and 30 gauge copper wire. In metric that is a 1.50mm hook and 0.254mm wire. I will make a nine row sample with 9 stitches (including the turning chain) in each row. I will explain these terms as I go.
Base Chain
To start, make a chain of ten stitches. In abbreviated instructions, that will read as
ch. 10
This is your base chain. You can count the chain stitches as illustrated below. Notice that you do not count the loop currently on the hook (your live loop).
 |
| base chain with stitch count |
The First Single Crochet (sc)
Now you have your base chain. You will insert the hook into the third chain from the hook.
 | ||
| third ch from hook |
Always insert the hook from front to back.
 |
| inserting the hook |
 |
| yarn over |
 |
| yarn over detail |
 |
| draw up loop |
 |
| yarn over |
 |
| the first single crochet (sc) |
You just finished your first single crochet (sc)!
Experienced yarn crocheters please note: I do not wrap the live wire around my left fingers for tension as is done with yarn. The stiffness of the wire is sufficient to maintain tension.
Another Single Crochet
Do it again. Note the asterisk... it is a marker for future reference.
*Now, insert the hook in the next chain to the left.
 |
| insert hook in next ch |
Yarn over (yo).
 |
| yo |
Draw up loop. You should have two loops on the hook again.
 |
| two loops on the hook |
Yarn over (yo).
 |
| yo |
Draw the yo through both loops on the hook.
 |
| the second sc |
Finishing the Row
Repeat from * until you run out of chain (that should be 6 more times).
Now you have one row and 9 stitches completed. That is, one turning chain and 8 single crochet. When counting stitches, the turning chain counts as a stitch.
 |
| the first row |
Open the Loops
This part is an extra step for experienced yarn crocheters.
Chain 1 (this will be your turning chain for the next row) and remove your hook.
 |
| turning chain |
Take your scribe and insert it into the first stitch to stretch it open a bit. You do not need to open the base of the turning chain. It kind of looks like a stitch but don’t think of it that way. Call it the base of the turning chain in your head at all time to avoid confusion and miscounting.
 |
| inserting the scribe |
Work your way across the row, opening each stitch.
As you are poking your scribe through each stitch, be sure you pick up the front and back portion of the stitch. When you look at the work from the top, the whole stitch makes a teardrop shape. It is really important to open the whole stitch.
 |
| picking the whole stitch |
When you come to the end of the row, be sure to open the turning chain. It can be a little tricky; it doesn’t look like a normal stitch. Go ahead and open it.
 |
| picking the turning chain |
Now that you have opened the loops, count the stitches and make sure you have the right number on your first row.
 |
| count the stitches |
For the purpose of counting stitches in a row, note that #1 is the base of the turning chain I mentioned before. Also, stitch #9 is the turning chain. The turning chain is actually a chain stitch and not a single crochet. You count it as a stitch when you are checking the number of stitches in a row.
Row Two
You are ready to start row two. First you need to put your hook back into the live loop. Make sure the live side is closest to you.
 |
| put the hook back in the live loop |
Turn the work.
Keep your hook with its loop in your right hand and turn the work from left to right with your left hand.
 |
| turn the work |
Take a look at your work and identify the base of the turning chain.
 |
| base of the turning chain |
Insert your hook into the first stitch. Yarn over and draw up a loop. You have two loops on your hook.
 |
| yo and draw up loop |
Yarn over again and draw the loop through both loops on the hook. You’ve now started row two!
 |
| first sc on row 2 |
When starting a stitch, make sure you insert the hook under both parts of the stitch below, just like when you opened the loops with the scribe.
 |
| working the next stitch |
Be sure to make a single crochet in the turning chain of the row below.
 |
| make a stitch in the turning chain |
At the end of row 2, you should have made one turning chain and 8 single crochet for a total of 9 stitches.
Now, chain 1. Remove your hook and open the loops with your scribe just like you did on row 1.
 |
| picking the loops on row two |
You have completed row 2. Take a break and admire your work!
 |
| row 2 completed |
Row 3 and Beyond
Now you know all the steps for making single crochet. To keep going, just repeat what you did for row two until you can make nice, even stitches.
 |
| carrying on with row 3 |
 |
| all the way to row 9 |
Finishing Out
I have done 9 rows now. I am ready to finish out.
Work your final row as before until you get to the last stitch. On the last stitch, yarn over and draw up a loop as before.
 |
| working the last stitch |
Now yarn over and draw through both loops on the hook to make the last stitch.
 |
| the last loop |
Clip the wire.
 |
| I use my wire nippers to cut the live wire |
and pull the hook until the end of the wire pulls through.


Stretch the loops with your scribe as you did for the previous rows.
 |
| row 9 loops are all stretched |
Use your fingers to stretch and flatten your sample. You can pull extra hard on the edges to even out the sides.
 |
| go on and pull really hard, it's strong stuff |
 |
| before stretching |
 |
| after stretching |
Clean Up
To make your sample look nice and neat, tie off the ends by wrapping them around the loops three times. Then, clip the tails and tuck the pokey bits with your needle nose pliers.
 |
| tie off the last stitch |
 |
| tie off the base chain |
 |
| nip off the tails |
 |
| tuck in the pokey bits |
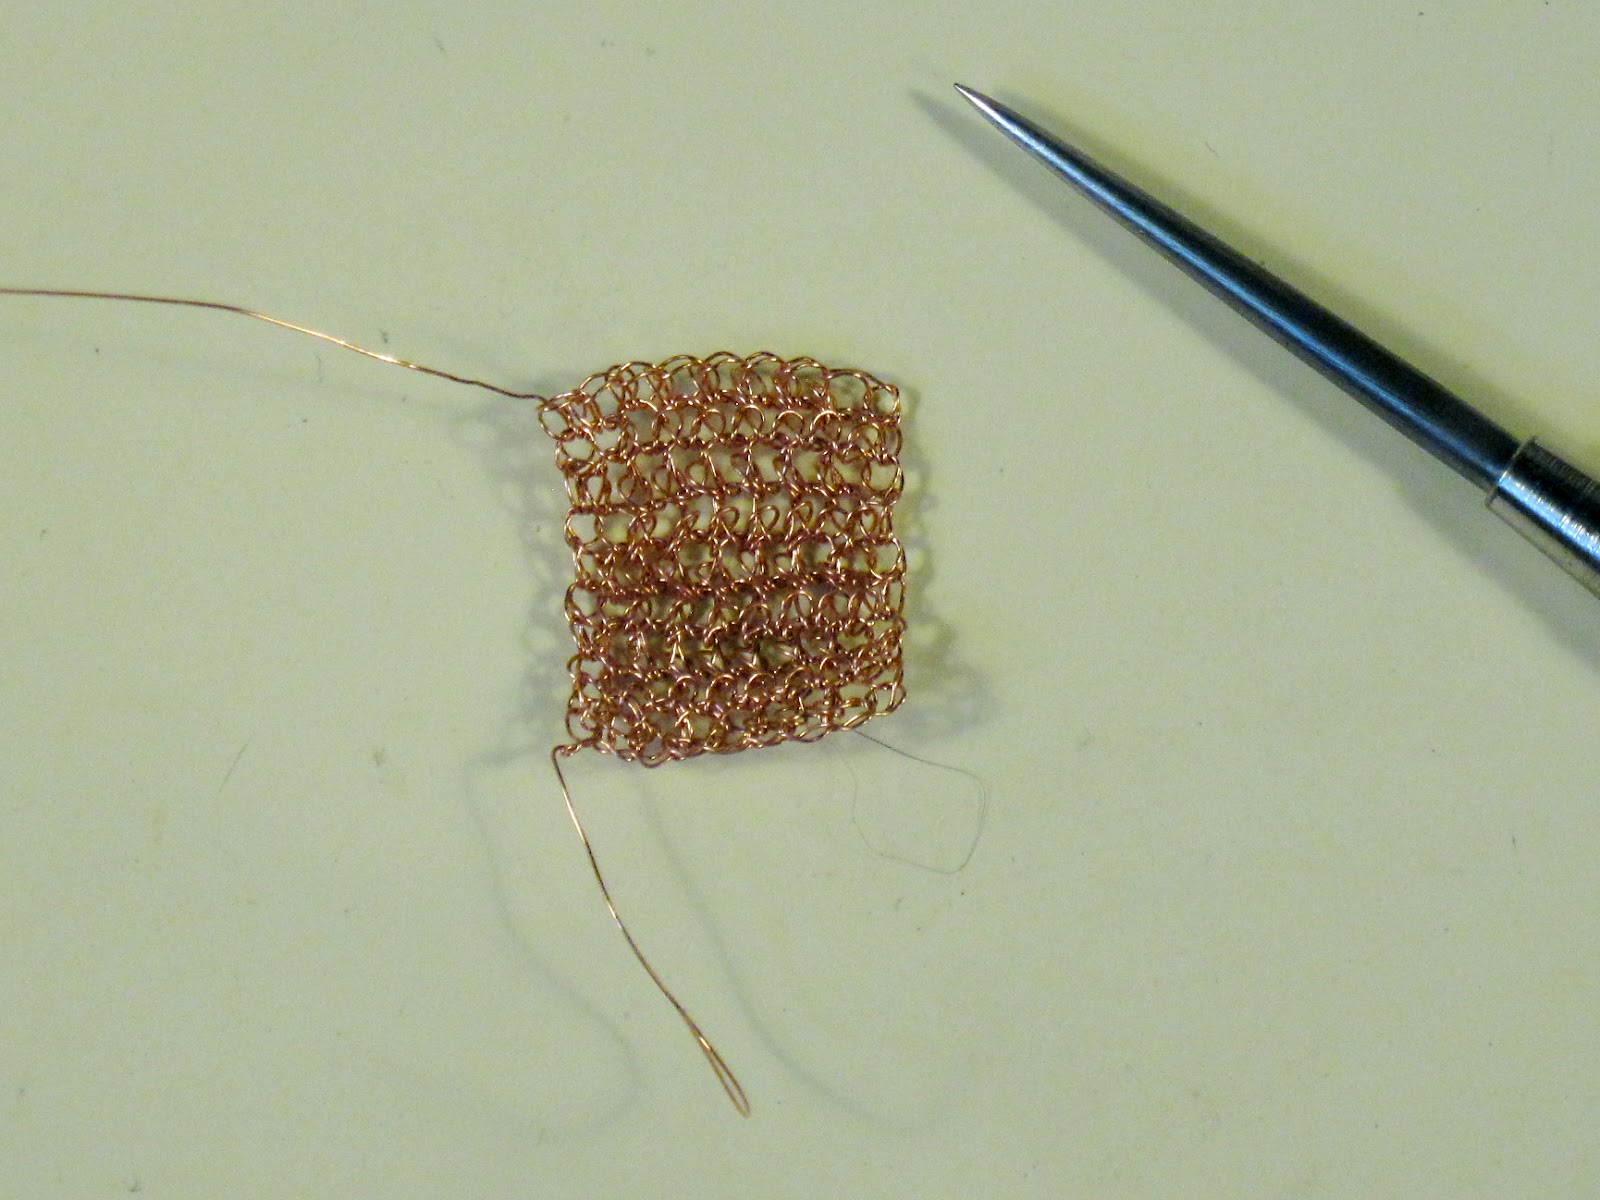
You have now finished your nine stitch, nine row sample of single crochet (sc).
Be sure to count your stitches carefully, as you work. If you find that you have an extra stitch, make sure you are not inserting your hook into the base of your turning chain. If you are short a stitch, make sure you are making a stitch in the turning chain of the row below.
 |
| the finished sample |
Abbreviations
Your new abbreviation is sc for Single Crochet.
The instructions for this lesson in abbreviated format are as follows:
start: ch 10
row 1: sc in 3rd ch from hook. sc 7 sts. ch 1, turn.
row 2: sc 8 sts. ch 1, turn.
rows 3-8: repeat row 2.
row 9: sc 8 sts. Cut off and draw up lp.
I hope you are enjoying crocheting in wire. Keep practicing and it gets easier. When I started learning, I had to look things up over and over until they came naturally. Don’t sweat it if you need to refer to the pictures and instructions frequently!
If you have any questions, please leave them in the comments section below or on my facebook page Annabelle Jones Jewelry. Don’t be shy; if you are confused, somebody else probably has the same question! See you next week for Lesson 4: Half-Double Crochet.


