Showing posts with label class. Show all posts

Thursday, March 22, 2012

Lesson 5: Double Crochet

Hello and welcome to today’s lesson: double crochet.
Double Crochet Sample

Double crochet is very similar to half-double. Many of the steps are the same. It is a little taller and a bit more open looking than single or half-double.

Abbreviations
ch = chain
lp = loop
hdc = half-double crochet
sc = single crochet
yo = yarn over
dc = double crochet
sts = stitches
st = stitch

Please refer back to previous lessons for more detailed explanation of abbreviations.

I am trying something new in this lesson...restraint. I will be using fewer photos; I hope that fewer images will actually make the instructions easier to follow. If not, let me know!

Materials
In this lesson, I am using 30 gauge copper wire and a no.8 crochet hook. I will also use a pocket scribe, wire nippers, and needle nose pliers.

Lets get started learning Double Crochet (dc)! The sample will be 9 stitches wide and 9 stitches tall.

To Start
Make a base chain of 12 stitches.

Chain 12

Row 1
Then, yarn over and insert the hook into the 5th stitch from the hook.

YO and insert hook...
 Yarn over and draw up a loop. You should now have three loops on the hook.

Three loops on the hook.
 Yarn over again.

Three loops and a YO.
This is where it is a bit different from the half-double crochet. Draw the yo through two loops on the hook. You should have two loops remaining on the hook.

Two loops remain on the hook.
YO again.

Two loops and a YO on the hook.
Draw the yo through the remaining two loops. You should now have one loop on the hook. You just finished a dc!

The first completed DC.
On to the next stitch.
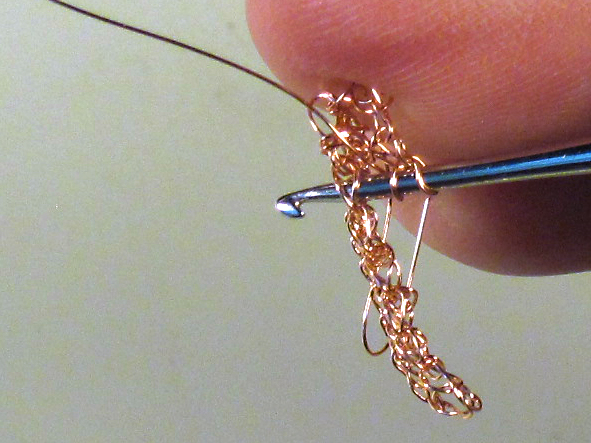
YO and insert your hook into the next ch. YO and draw up the lp. You should have three loops on the hook.

Three loops on the hook, again.
YO and draw the yo through only two loops on the hook. Now, two loops remain on the hook.

And, two loops on the hook.
YO again and draw the yo through the two remaining hooks. You have one remaining loop on the hook and two completed dc (plus a turning chain).

This is actually three completed dc plus a turning chain.

You will repeat six more times:
yo, insert hook into next st, yo, draw up lp (three lps on hook), yo and draw through two loops on hook (two lps on hook), yo and draw through two remaining loops on hook.

Once you have filled up your base chain with double crochet stitches for a total of 8 dc and the turning chain = 9 stitches, chain 3 for the turning chain.

First row complete plus the turning chain.

Opening the Stitches
Pull out your hook and use the scribe to open up the tops of the stitches.

Opening the loops. Skip the base of the turning chain!
Be sure to get both parts of the top of a stitch when you are opening the loops.

The two loops that make the top of a stitch.

And, be sure to open the top of the turning chain. It looks different from the double crochet stitches.

Opening the top of the turning chain.

Row 2
Put your hook back into the new turning chain and turn the work. YO and insert the hook into the first stitch. Be sure you skip the base of the turning chain!

Starting the second row.
Yo and draw up the loop. You are back to three stitches on the hook. Carry on as before.

Three on hook.
Always make sure you are inserting the hook into both loops of the stitch below when you start a new stitch. There are times when a pattern calls for working in the front or back of a stitch but, generally, you want to work through the whole stitch.

Top view of hook in both loops of the stitch below.
When you have completed a turning chain plus seven stitches, you still have one double crochet left to complete the row. It goes in the top of the turning chain from the row below. Don’t skip that stitch, even though it looks a little different!

Hook in the top of the turning chain of the row below.
After you complete the last stitch in the row, chain three for the turning chain and remove your hook.
Open up the new row of stitches with your pocket scribe and then repeat row two until you are done.

Two rows done plus a turning chain.

Finishing Out
Once you have finished making as many rows as you like (I did nine in this sample),
work through your last stitch and nip the wire. Tie in your ends as explained in previous lessons and then stretch your sample.

Stretch the sample.

Abbreviations
Your new abbreviation for this week is dc for double crochet.

The instructions for this lesson in abbreviated format are as follows:

start: ch 12
row 1: dc in 5th ch from hook, dc 7 sts more. ch 3, turn.
row 2: dc 8 sts. ch 3, turn.
rows 3-8: repeat row 2.
row 9: dc 8 sts. Cut off and draw up lp.

The samples: single, half-double, and double crochet.
Thank you for joining me. Those of you who have been waiting patiently for a new lesson, please accept my heartfelt apologies. I am committed to getting back on schedule and the next lesson, Triple Crochet, will be posted on Wednesday.

Did you like the format with fewer photos? Let me know in the comments section. Please feel free to ask questions, as well.

Thursday, February 23, 2012

Lesson 2b: Tying Out

Hi all. This is Part B of Lesson 2. You can find Part A here.

I hope you are off to a good start on making chains. The chain is the foundation for just about everything else you will do in crochet so get in lots of practice. Plus, by the time you are making awesome, even chains, holding the hook and wire will be easy and comfortable and you will be ready to move on to more complicated stitches. We left off last lesson with a length of chain stitch.
The completed chain.

So, now I will demonstrate tying out. Tying out is a good way to tidy up your piece and prevent unraveling. You can also use the tails to attach your chain to other findings and pieces of crochet. Although unraveling is less likely with wire, it can happen if you give an open end a really good yank. Try it some time, just to see what happens; you won't be able to reuse the wire, though.

Back to tying out, take the end you just cut off and look at it. Make sure you aren’t undoing your work as you tie out.

The just finished end.

Just push the tail through the last chain you made. Pull it until the tail makes a tight loop around the tip of the last chain. Push the tail through in the same direction again and pull it tight two more times.

Pushing the tail through.

The tail is pulled tight.
After making your three passes through, nip off the tail as close to the chain as you can. Be sure not to cut your chain! Then, use your pliers to tuck in the spiky little end.
Nip the tail.
The nipped off end with a pokey little bit.
Tuck in the pokey with your pliers.


Now, flip over your chain and tie out the other tail the same way. You can use the pliers to pull the loop tight, if you need.

The starting end of the chain.

Use pliers to pull the wraps nice and tight.
Nip and tuck as with the other end and you are all done!


Here is a little video, putting it all together.


Some Useful Abbreviations
ch = chain stitch
yo = yarn over
These are common throughout crochet instructions.

If you have any questions or comments, please leave them in the comments section below.
I hope to see you next week for Lesson 3: Single Crochet.

Wednesday, February 15, 2012

Crocheting in Metal: Lesson 1 - Supplies and Materials

Traditional doily pattern in blue coated copper wire.
Before starting on the actual crocheting, we need to talk about tools and materials. One of the great things about crocheting in metal is that you can do it just about anywhere. All of your tools and materials will fit nicely into a pencil box; you can just throw it into your bag and create on the go. You don’t need many tools to get started and they aren’t expensive or hard to find. There is a concise list of supplies and sources at the end of this post.

Crochet Hooks
#9, 8, 7 Steel Crochet Hooks
The first thing you will need are crochet hooks. I use steel hooks for crocheting metal (the colorful aluminum ones are way too big). I strongly recommend sizes 7, 8, and 9 (1.65, 1.50, 1.40mm) to start. I know, I know, they are tiny; your wire will also be tiny so it all works out.

detail of hooks
Pictured are 7, 8, and 9 hooks. Notice that the hooks get smaller as the numbers get bigger.

You can purchase these at any craft store that carries knitting supplies and some big-box retailers. If you already own some hooks, just use those. You don’t need a new set just for metal. I use mine for both metal and thread.


Wire
You will also need wire. Most of my finished work is done in fine silver (which is pure silver) but I use copper for samples. I recommend that you start with copper because you will need lots of practice and shouldn’t worry about messing up.
30 Gauge fine silver and copper wire on spools
The gauge of your wire is very important; gauge refers to the thickness of the wire. I use 30 gauge for most of my work. All demonstrations and explanations will be with 30 gauge (.254 mm) wire. If you just can’t find 30, 32 gauge is okay. Just like with the hooks, the wire gets smaller as the number gets bigger. Therefore, 32 gauge wire is thinner than 30 gauge. Don’t go thicker than 30 gauge. Thick wire is really hard to work with and you will end up with wicked blisters and callouses on your fingers.

The metal is important, as well. Use copper for crocheting. Brass and sterling silver get hard and brittle as you work and make life difficult. It’s fine if the copper has a color coating on the outside as long as it’s copper on the inside. Look carefully at a cut end for copper color, if you aren’t sure.

Wire is sold in spools and coils. Be sure to get spooled wire. Untangling coiled wire is time consuming and hardens the wire.

I order my 30 gauge copper from Fire Mountain Gems and my fine silver from Rio Grande. The craft stores only seem to carry 32 gauge in my area. Since I am usually working toward a design in silver, I like to use the same gauge in my samples that I will use on the finished piece.

Pocket Scribe
My handy pocket scribe
You will also need a scribe for crocheting in wire. If you are used to working in yarn, this will be a new tool for you. It is very, very useful. Mine is a pocket scribe that can be closed up for safe carrying. Your scribe should be fairly sharp with a gradual taper. I have used mine from the beginning and find it essential in the process (so much so that I have two and I rarely buy two of the same tool). I poked around for some reasonable substitutes but a #0 knitting needle isn’t sharp enough and a #20 tapestry needle doesn’t get fat enough. So, get yourself a scribe.
Scribe detail: notice the taper, it is important
I bought one at the local hardware store (Elliot’s) and one at an art supply store that sells jewelry tools. If you go to the hardware store, take the picture with you. It will make your life much less complicated. Regarding the hardware store: the small local one is more likely to have it; I haven’t had much luck finding them at the big-box stores. If you prefer to shop online, just google “pocket scribe”.

Wire Cutters
Diagonal Wire Cutters (this pair is 14 years old and still cutting!)
A pair of wire cutters is essential. After all, you are going to need to cut the wire at some point and using scissors will wear out the edge quickly. The little, palm sized ones are just fine. If you have to get a pair of pliers, you can just pick up a set that includes pliers and cutters. Diagonal cutters are better than end cutters for this application but either will work in a pinch.

You can get these at any hardware store.

Pliers
Long Chain Nose Pliers (also rather old.)
You will need a pair of pliers for grabbing hold of tiny wire ends and tying things off. Needle nose or long chain nose pliers are ideally suited for this purpose. Regular chain nose pliers are okay. Make sure the pliers have smooth jaws. Serrated jaws are less precise and mar the wire, making it itchy and uncomfortable.

You can also pick these up at the hardware store.

Handy Little Extras
The essential tools to get started
I keep everything together in my happy pink pencil box. It all fits nicely in there but be sure to wrap your pliers and hooks in a piece of cloth to protect them from scratching each other. I also have a sketchbook where I write down notes, patterns, and design ideas. It is really useful to jot down what size hook and wire you used to make a particular sample.

A Few Tips
  • Protect your pliers and only use them on non-ferrous metals (no steel!). You want to keep the plier faces nice and smooth. They are definitely not for pulling that evasive nail out of the wall.
  • Don’t let your tools get wet. Ever. They will rust and you will be sad.
  • Don’t unroll and re-roll your wire or pull on it unnecessarily. The less it moves, the easier it is to work.
  • Don’t drop your spool of wire. Aside from the frustrating tangle that inevitably results, this hardens the wire and makes it prone to breaking and difficult to work with.
  • Take good care of all of your tools. They are a lifetime investment.
So, that’s all for today. Go get your tools and come back next week for Lesson 2: Chain Stitch. Let me know if you have any questions in the comments section below.

Shopping List and Suppliers
  • Steel Crochet Hooks #7, 8, 9 - any craft store that sells knitting supplies
  • 30 Gauge Copper Wire (or 32 Gauge) - some craft stores, Fire Mountain Gems
  • Pocket Scribe - local hardware store, online
  • Diagonal Wire Cutters - hardware store, craft store with the jewelry supplies (pricey and generally lower quality)
  • Needle Nose/ Long Chain Nose Pliers - ditto
  • Pencil Box - anywhere you can buy school supplies
  • Sketchbook - art store, craft store

Thursday, August 20, 2009

Time to Focus and Prepare

A new semester approaches.
It is time to buckle down and clarify all of the ideas and plans for the fall. I am looking forward to teaching another semester of Metalwork and Jewelry Design but I am not without a certain amount of anxiety and jitters. I have so many ideas for the new class and I am really excited about the new and improved projects I am designing. I hope to have a group of students who will be as enthusiastic and hard working as students of past semesters.

In addition to new classes, I am currently developing a blog with materials to supplement in class offerings. All of the possibilities for using the Internet to enhance teaching are becoming more clear to me, now that I have played around a bit in the blogosphere. If you are at all interested in metalworking, I hope you will visit throughout the semester at http://jewelrystudio217.blogspot.com/. Although the material will be primarily directed towards my class, there will be links, tips, tricks and tutorials that will be of interest to studio metalsmiths and all are welcome.

My goals for this semester are:
  • Be more organized.
  • Offer more slide presentations in class.
  • Create better projects that enhance student learning and encourage enthusiastic participation.
  • Get more involved in my school and promote my course more effectively.
  • Improve my in class demos.
  • Effectively use the new blog to enhance learning and engage my students outside of the classroom.
  • Successfully balance my professional development with my teaching responsibilities.
  • Remember why I love teaching, every day that I walk in to the classroom.

Having the opportunity to teach really is a blessing. Sometimes I lose sight of that in the bustle and worry about doing everything right. Teaching is not always easy but it can be very rewarding. I am fortunate to have had incredible teachers throughout my studies. I hope that I am successful in honoring what those teachers have given me by passing on the knowledge of my craft with integrity.